


Are you struggling with uploading multiple images to your Rails application? Worry no more! In this article, I will guide you through the process of uploading multiple images to your Rails API application.
Active storage
Active storage makes it easy for us to upload files like images, and documents to cloud storage services like Amazon S3, Google Cloud Storage, or Microsoft Azure Storage. This is done in the production environment. In the development and test environment, active storage provides us with a local disk service where you can easily store your images locally when developing your project. It allocates each image to a particular record with the help of Active Record objects.
Article workflow
In this article, we will focus on uploading images to Active Storage in the development environment. Stay tuned for the upcoming Part 2, where we will dive into uploading images in the production environment.
To illustrate the implementation of Active Storage, we will create a gallery API Rails application. This application will empower users to create accounts and post galleries of captivating images.
Implementing active storage
Let's get started with creating our Rails application. Open your terminal and execute the following commands:
rails new blogApi --api --database=postgresql
— api to let rails know that we will be creating API for this project and — database=postgrsql to specify the database we will be using.
Install dependencies
open the project folder and install all the dependencies with the commands below
cd galleryApi
bundle install
Models and controllers
rails generate scaffold users name:string email:string
rails generate scaffold galleries title:string description:string user:references
These commands automatically generate the models and controllers for users and galleries in our project.
Note: We intentionally omit the "avatar" attribute in the user table and the "pictures" attribute in the gallery table. Active Storage will handle these attributes and associate them with the corresponding records in the tables, leveraging the power of Active Record.
Install active storage
Run this command in the terminal to install active storage
rails active_storage:install
This command generates a migration file that creates 3 tables namely: active_storage_blobs, active_storage_attachment, and active_storage_attachments. These tables help active storage to easily upload and attach your files to the responding table for example upload an avatar for a user table.
For more info about each of the tables, you can visit this link
Create database
Ensure your database is set up correctly by running the following command:
rails db:create db:migrate
This command creates the necessary tables in the database for our project. Confirm your schema file matches the expected structure.
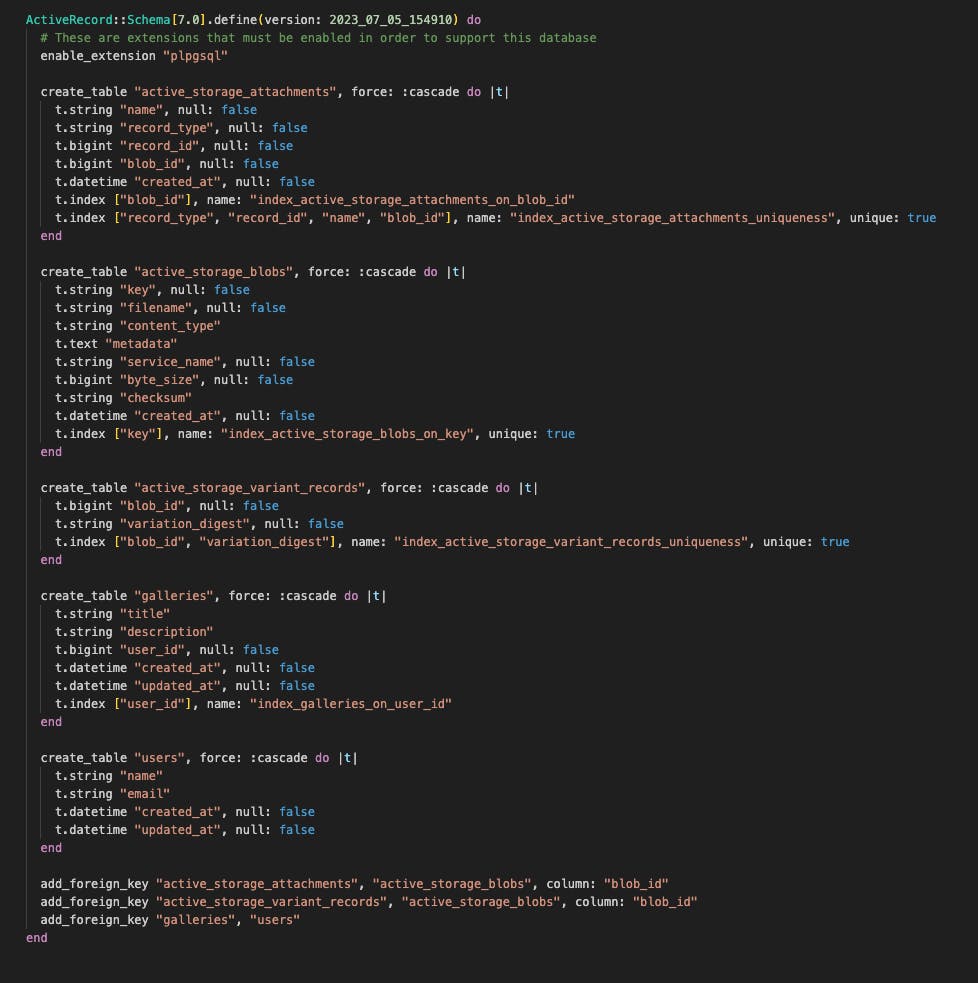
If your schema looks the same then you are good to go!
modify the models
In the user and gallery models, we need to make specific modifications to support file attachments. Update the models as follows:
In the user model add this code has_one_attached :avatar
Which means we will upload just one picture for the avatar. The user model should look like this.

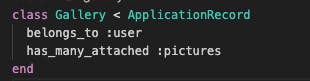
In the gallery model add this code has_many_attached :pictures
With this code, we will be able to upload more than one picture. The gallery model should look like this.
Modify the controllers
Add avatar in the user params method and take note on the params.require as shown below

Add pictures[] in the gallery params as shown below

Generate Serializers
Serializers provide a flexible way to customize how JSON is rendered by our controllers. In this case, we want the controllers to render the URLs of the images in JSON format.
let's install the dependencies by adding this code in our gemfile and running bundle install
gem 'active_model_serializers'
Create user and gallery serializers
Run these commands in the terminal
rails g serializer user
rails g serializer gallery
In the generated user_serializer.rb modify it to like the code below

In the generated gallery_serializer.rb modify it to like the code below

Set routes
The last thing to do is to set the default route of the URLs of the images.
go to the route.rb and add this line of code default_url_options :host => "localhost:3000" as shown below
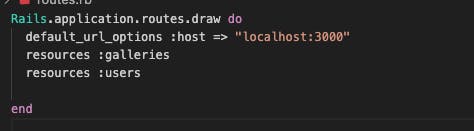
Note: change the port number base on your default port number as you can see mine is 3000
Test Apl endpoints
I will be using a vs code extension called thunder client to test it. You can also use Postman to do it.
Let's start our server
rails s
let's test the endpoint to create a new user and upload an avatar

As you can see we have the avatar url. Take note of the API endpoint I'm using here. If you want to see all the endpoints run rails routes in your terminal.
let's test the endpoint to create a new gallery and upload pictures

I have uploaded two pictures for this gallery as you can see their URLs. You can test it by copying the URL and paste in your browser to see if the image is uploaded successfully.
Conclusion
In this post, we successfully upload images with active storage on the development environment. In the next post, I will show you how you can upload images in the production environment.